Pages

Showing posts with label Video. Show all posts

Friday, 12 June 2015

Media Player Setup For PC (December 2023)

Updated 12 December 2023:
At the top, I will just include a quick update on the latest software I am using and their link. Since with the wide availability of affordable Chinese DAC such as Topping, SMSL, Gustard and etc. The audio is being pass-through to the DAC. Therefore, now I am only using MPC-HC + madVR.
1) Media Player Classic Home Cinema https://github.com/clsid2/mpc-hc/releases
With many of the K-Pop and C-Pop MV available on YouTube, now we can just stream the MV from YouTube using MPC-HC with our madVR HQ-PQ (high quality picture quality).
3) Youtube Streamer & Codec :

OLD Section (June 2015):
Media Player Classic, LAV Filters & madVR have some huge chances since my last post 
and here is some highlight of the main chances:

i) LAV Filter has been used as Media Player Classic internal filter ( mean that we do not need to download and install LAV as external filter anymore)

ii) LAV Audio able to decode DTS, DTS-HD, TrueHD using libdcadec ( mean that we do not need to use external ArcSoft decoder anymore)

iii) madVR new "NNEDI3" is producing nice picture quality in my opinion ( mean that we do not need to install AviSynth anymore in my opinion)

Software to download:
1) Media Player Classic Home Cinema http://nightly.mpc-hc.org/
2) madVR http://forum.doom9.org/showthread.php?t=146228
3) ffdshow http://sourceforge.net/projects/ffdshow-tryout/files/SVN%20builds%20by%20clsid/generic%20builds/
* UNCHECK everything in ffdshow during installation process except "Audio Decoder"


Media Player Classic Home Cinema (MPC-HC)
1) After everything installed, open MPC-HC.
2) Press "o", go to "Playback" "Output". For "Audio Renderer", choose "ReClock Audio Renderer".
3) For "DirectShow Video", choose "madVR" or choose "Enhanced Video Renderer (custom presenter)" for those having problem with madVR.


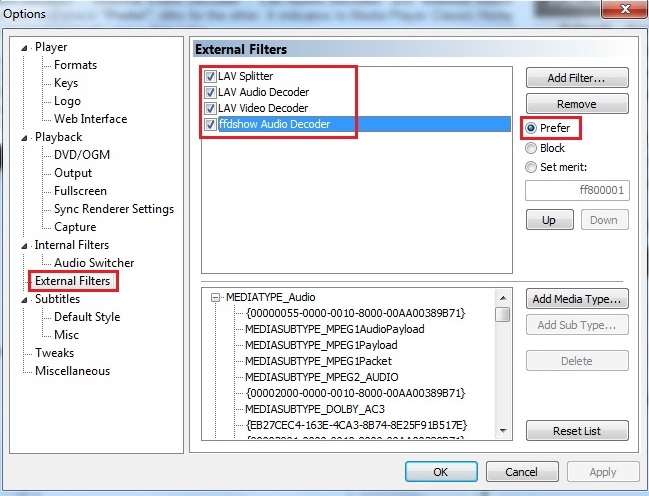
4) Then, go to "External Filters", click "Add Filter" and add "ffdshow Audio Decoder".
5) After adding it, make sure to set it to "Prefer".


6) Since, "LAV Filter" is the "Internal Filters" for now, we used the default settings for "Source Filters" and "Transform Filters".
7) Therefore, in order to change "LAV Filter" settings, we need to click the three button available at the bottom.


8) Then, click "Video Decoder".
9) For "Hardware Decoder to use":
     Choose "Intel QuickSync" for Intel HD integrated graphic
     Choose "DXVA2" for ATI Radeon graphic card
     Or just leave it at "None"
* Make sure the settings that you choose have an "Available" shown beside it.
** For PC that have i3 processor or better but have lower Graphic Card (normally laptop), choose "None" when you experience lagging in playing HD files.


     Choose "NVIDIA CUVID" for Nvidia Geforce graphic card
     CHECK "Enable Adaptive HW Deinterlacing" & "High-Quality Processing".


10) Click "Apply" to save all the settings.


madVR
1) Open a video file with MPC-HC.
2) Right click and choose "Filters" > "madVR".

3) Choose "Edit Settings".


4) Under "devices", choose the device type. Should be "Digital Monitor/TV" unless you are using CRT.


5) Under "processing" > "deinterlacing", you can either UNCHECK everything.


6) Under "rendering" > "general settings", you can either UNCHECK everything or CHECK "enable automatic fullscreen exclusive mode" that ignored all the interruption from your PC when you are in fullscreen mode or CHECK "enable windowed overlay (Windows 7 and newer)"


8) Then for "trade quality for performance", UNCHECK everything.


9) Now to set the "scaling algorithms" for madVR. First download GPU-Z from http://www.techpowerup.com/downloads/SysInfo/GPU-Z/ and run it.
10) Then test the following settings from top to bottom and see at which setting that your GPU load is not too high (less than 80%):

   chroma upscaling                  image upscaling                    image downscaling
        NNEDI3, AR                           Jinc,  AR                         Catmull-Rom, AR, LL
          Jinc,  AR                                Jinc, AR                          Catmull-Rom, AR, LL
     Bicubic, 75, AR                 Lanczos, 3 taps, AR                    Catmull-Rom, AR
         Bicubic, 75                        Lanczos, 3 taps                           Catmull-Rom
            Bilinear                                  Bilinear                                      Bilinear

*AR = activate anti-ringing filter
*LL = scale in linear light


11) Click "OK" to save all settings.

ffdshow
1) Press "Start" > "All Programs" > "ffdshow" > "Audio decoder configuration".

2) Under "Codecs", choose "all supported" for "Uncompressed".

3) Under "DirectShow control", choose "only one - check all previous filters" for "Multiple ffdshow instances".

4) Under "Profiles/Preset settings" > "Decoder options", CHECK "Enable jitter correction".

5) For "Processing", CHECK everything.

6) Then go to "Mixer", for 2.0 speaker user, just CHECK "Mixer" and select "2/0/0 - stereo" for "Output speaker configuration".

For 2.1 speaker user, CHECK "Mixer" and "LFE" and select "2/0/0 - stereo" for "Output speaker configuration".

7) For "Output", CHECK "16-bit integer", "24-bit integer", "32-bit integer" & "32-bit floating point".

8) Click "OK" to save all settings.

ReClock

1) Open ReClock. At the "Audio settings" tab, UNTICK everything.


    A) Set PCM to "WASAPI Exclusive".

    B) Pre-buffer Duration, leave it as "500". 
         OPTIONAL: You can test around and see which setting suit your personal taste ranging 25 to 1000.

    C) For Format set it to "24 bit int padded to 32" while for Sampling rate, it can be leave as "Same as input (default)" for normal users or UD100. 
         OPTIONAL: If your DAC is capable of better setting then set Sampling rate to your DAC max setting such as 96kHz192kHz or 384kHz.

    D) Set Quality to "Best Sinc Interpolation".

2) Go to "Video settings" tab

UNTICK "Use built-in estimator (recommended)" on both side as these settings may chuck up the videos after few seconds of opening.

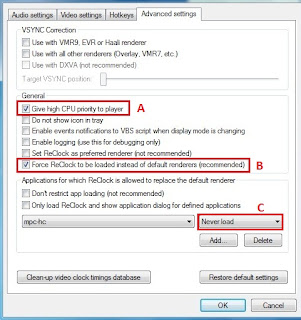
3) Go to "Advanced settings" tab and UNTICK everything except (B) "Force ReClock to be loaded instead of default renderers (recommended)".
  
    OPTIONAL: TICK (A)"Give high CPU priority to player", this setting will let your player have higher priority over other software and ensure less lagging and chuck up.


4) Click "OK" and ReClock is ready to use. So everytime you open a supported media player such as Media Player Classic, Zoom Player, PowerDVD and etc, a box will pop up and ask whether to load ReClock or not. You can either choose to always load or never load. These setting can be change in (C).

Verdict
It's actually quite happy to see new breakthrough and collaboration to further improve PC Media Player quality as nowadays I am using my PC as a media center more and more frequent.


Monday, 17 June 2013

Media Player Setup For PC

If you feel like CCCP is not giving you the best audio and video quality while K-Lite installed too many unnecessary stuffs then you can try this setup. This is my personal prefer setup by mostly referring to http://www.homecinema-hd.com/us/tutorials/windows/htpc/tutorial-htpc-1.html.

PC System:
A) For PC that have i3 processor or better & a Nvidia Geforce midrange graphic card install everything below except 4.
B) For PC that have i3 processor or better that use either Ati Radeon or Intel integrated graphic install everything below except 5 & 6.
C) For PC that has processor older than i3 but has a 128mb dedicated ram Nvidia Geforce or Ati Radeon graphic card install everything except 5 & 6.
D) For PC that does not meet anything above install everything except 3, 5 & 7.

Download & Install
Software that you need to download for this setup: (every software just download and install the 32bit version is enough, just ignore those 64bit version)
1) Media Player Classic Home Cinema http://nightly.mpc-hc.org/
2) LAV Filter https://code.google.com/p/lavfilters/downloads/list
3) madVR http://forum.doom9.org/showthread.php?t=146228
4) ffdshow http://sourceforge.net/projects/ffdshow-tryout/files/SVN%20builds%20by%20clsid/generic%20builds/
* UNCHECK everything in ffdshow during installation process

5) ffdshow with AviSynth (ffdshow) (AviSynth) (AviSynth Patch)
Install ffdshow as default & tick AviSynth when prompt as below:

Install AviSynth. Unzip AviSynth Patch & replace the file "avisynth.dll" in:
  • 32bit Windows: "C:\Windows\System32"
  • 64bit Windows: "C:\Windows\SysWOW64"
After that copy the directory "plugins" and replace the directory "plugins" in:
  • 32bit Windows: "C:\Program Files\AviSynth 2.5"
  • 64bit Windows: "C:\Program Files (x86)\AviSynth 2.5"
6) xy-VSFilter https://code.google.com/p/xy-vsfilter/wiki/Downloads?tm=2
* xy-VSFilter has some compatibility problem with DXVA gpu acceleration.

7) ReClock http://www.videohelp.com/tools/ReClock-Directshow-Filter
8) ArcSoft TotalMedia Theatre http://www.arcsoft.com/totalmedia-theatre/

Media Player Classic Home Cinema (MPC-HC)
1) After everything installed, open MPC-HC.
2) Press "o", go to "Playback" "Output". For "Audio Renderer", choose "ReClock Audio Renderer".
3) For "DirectShow Video", choose "madVR" or choose "Enhanced Video Renderer (custom presenter)" for PC System D.

4) Then, go to "Internal Filters", right click and choose "Disable all filters" for "Source Filters" and "Transform Filters".

For PC System B, C & D
5) Then, go to "External Filters", click "Add Filter" and add according to this order from top to bottom: "LAV Splitter", "LAV Audio Decoder", "LAV Video Decoder", "ffdshow Audio Decoder".
6) After adding to this order, make sure to repeat and set each filter to "Prefer".

For PC System A
5) Then, go to "External Filters", click "Add Filter" and add according to this order from top to bottom: "LAV Splitter", "ffdshow Video Decoder", "LAV Audio Decoder", "LAV Video Decoder", "ffdshow Audio Decoder".
6) After adding to this order, make sure to repeat and set each filter to "Prefer".

7) Then, go to "Audio Switcher" and make sure everything is UNCHECK.

8) Click "Apply" to save all the settings.

LAV Filter
1) Go to "External Filters" and double click on "LAV Video Decoder".

For PC System B, C & D
2) For "Hardware Decoder to use":
     Choose "NVIDIA CUVID" for Nvidia Geforce graphic card
     Choose "Intel QuickSync" for Intel HD integrated graphic
     Choose "DXVA2" for ATI Radeon graphic card
     Or just leave it at "None"
* Make sure the settings that you choose have an "Available" shown beside it.
** For PC that have i3 processor or better but have lower Graphic Card (normally laptop), choose "None" when you experience lagging in playing HD files.

For PC System A
2) For "Hardware Decoder to use":
     Choose "NVIDIA CUVID" for Nvidia Geforce graphic card
     CHECK "Enable Adaptive HW Deinterlacing" & "High-Quality Processing".
     Choose "25p/30p (Film)" for Output Mode.

3) Go to "Formats" tab, UNCHECK "vc1", "wmv3" & "wmv12". This is because LAV seem to have random crash when playing wmv video file.

4) Click "OK" to save all the settings.
5) For "LAV Audio Decoder", the setting should be ok at defaults. But you can check the screenshots below for confirmation.


madVR
1) Open a video file with MPC-HC.
2) Right click and choose "Filters" > "madVR".

3) Choose "Edit Settings".

4) Under "devices", choose the device type. Should be "Digital Monitor/TV" unless you are using CRT.

For PC System B, C & D
5) Under "processing" > "deinterlacing", you can either UNCHECK everything or if you happen to have a lot of DVD iso movies, CHECK "automatically activate deinterlacing when needed" with "if in doubt, deactivate deinterlacing" & "only look at pixels in the frame center".

For PC System A
5) Under "processing" > "deinterlacing", you can either UNCHECK everything.

6) Under "rendering" > "general settings", you can either UNCHECK everything or CHECK "enable automatic fullscreen exclusive mode" that ignored all the interruption from your PC when you are in fullscreen mode.

7) Then for "smooth motion", you either UNCHECK it or CHECK it with "only if there would be motion judder without it".
* Personally, I don't like smooth motion.

8) Then for "trade quality for performance", UNCHECK everything.

9) Now to set the "scaling algorithms" for madVR. First download GPU-Z from http://www.techpowerup.com/downloads/SysInfo/GPU-Z/ and run it.
10) Then test the following settings from top to bottom and see at which setting that your GPU load is not too high (less than 80%):

   chroma upscaling                  image upscaling                    image downscaling
     Jinc, 8 taps, AR                     Jinc, 8 taps, AR                    Catmull-Rom, AR, LL
     Jinc, 3 taps, AR                     Jinc, 3 taps, AR                       Catmull-Rom, AR
     Bicubic, 75, AR                 Lanczos, 3 taps, AR                    Catmull-Rom, AR
         Bicubic, 75                        Lanczos, 3 taps                           Catmull-Rom
            Bilinear                                  Bilinear                                      Bilinear

*AR = activate anti-ringing filter
*LL = scale in linear light

11) Click "OK" to save all settings.

ffdshow
1) Press "Start" > "All Programs" > "ffdshow" > "Audio decoder configuration".

2) Under "Codecs", choose "all supported" for "Uncompressed".

3) Under "DirectShow control", choose "only one - check all previous filters" for "Multiple ffdshow instances".

4) Under "Profiles/Preset settings" > "Decoder options", CHECK "Enable jitter correction".

5) For "Processing", CHECK everything.

6) Then go to "Mixer", for 2.0 speaker user, just CHECK "Mixer" and select "2/0/0 - stereo" for "Output speaker configuration".

For 2.1 speaker user, CHECK "Mixer" and "LFE" and select "2/0/0 - stereo" for "Output speaker configuration".

7) For "Output", CHECK "16-bit integer", "24-bit integer", "32-bit integer" & "32-bit floating point".

8) Click "OK" to save all settings.

ffdshow with AviSynth
1) DO everything as shown in ffdshow above.
2) Press "Start" > "All Programs" > "ffdshow" > "Video decoder configuration".

3) Under "Codecs", choose "wmv9" for "VC-1""libavcodec" for "MPEG2" & CHECK "DVD Decoding",

4) Choose "all supported" for "Raw video".

5) Under "DirectShow control", choose "only one - check all filters in graph" for "Multiple ffdshow instances".

6) Under "Profile/Preset settings", click "New" and then "Rename". Create 4 profiles with the name "FHD", "HD", "DivX" & "Other". CHECK "Automatic Preset Loading".

7) Select "FHD" and click "Preset autoload conditions".
8) Select "On all conditions match (AND)", then CHECK "on movie dimension match".
9) Type "1920" in the top 2 boxes. Choose "or". Type "721" & "1080" in the bottom 2 boxes.

10) Select "HD" and click "Preset autoload conditions".
11) Select "On all conditions match (AND)", then CHECK "on movie dimension match".
12) Type "1280" & "1919" in the top 2 boxes. Choose "or". Type "720" in the bottom 2 boxes.

13) Select "DivX" and click "Preset autoload conditions".
14) Select "On all conditions match (AND)", then CHECK "on movie dimension match".
15) Type "16" & "1279" in the top 2 boxes. Choose "and". Type "16" & "719" in the bottom 2 boxes.
16) CHECK "on FOURCC from previous filter match" and paste:
3IV1;3IV2;3IVD;3VID;DIV3;DIV4;DIVX;DX50;MP4V;M4CC;FVFW;MPG4;MP42;MP43;M4S2;NDIG;PVMM;SEDG;RMP4;XVID

17) Select "Other" and click "Preset autoload conditions".
18) Select "On all conditions match (AND)", then CHECK "on movie dimension match".
19) Type "16" & "1279" in the top 2 boxes. Choose "and". Type "16" & "719" in the bottom 2 boxes.

20) Under "Show/hide filters", select "AviSynth", "Deband" & "Deinterlacing" for "FHD" profile.

21) For "HD" profile, select "AviSynth", "Deband" & "Deinterlacing".

22) For "DivX" profile, select "AviSynth", "Blur & NR", "Deband""Deinterlacing" & "Postprocessing".

23) For "Other" profile, select "AviSynth", "Blur & NR""Deband" & "Deinterlacing".

24) Under "Decoder options", choose EVERY profile and set the "Number of decoding threads" according to your processor number of cores. Processor with Hyper Threading can double up the amount of physical cores available.

25) Under "Deinterlacing", choose EVERY profile and CHECK "Process whole image" & "Deinterlacing". Choose "Yet Another DeInterlacing Filter (yadif)" for "Method".

26) Choose "DivX" profile, CHECK "Postprocessing" & "fast SPP deblocking". Select "30%" for "Processing strength".

27) Under "Deband", CHECK "Deband" for EVERY profile.
28) Set "Threshold" to "1.02" for FHD, "1.05" for HD & "1.2" for DivX & Other.

29) For "DivX" & "Other" profiles, CHECK "Blur & NR".
30) Under "Blur & NR" for both profiles, CHECK only "denoise3d" & "HQ". Set "luma:1.00, chroma:2.00, time:5.00".

31) Under "AviSynth", select EVERY profile and CHECK "Avisynth". UNCHECK "Add ffdshow video source". CHECK only "YV12" for Input color space. CHECK "Buffer back/ahead" and type "0 / 6". Then paste the following coding into the box according to your screen resolution.

For FHD monitor or TV (1920 X 1080 resolution)
* The coding "SetMTMode(3,0)"; the "0" mean "auto" for number of processing threads. You can change it to your corresponding number of threads.
32) For FHD profile,
SetMemoryMax(512)
SetMTMode(3,0)
ffdshow_source()
SetMTMode(2)
LSFMod(defaults="slow",ss_x=1.0,ss_y=1.0,strength=40)
SetMTMode(1)
GetMTMode(false) > 0 ? distributor() : last

33) For HD profile,
SetMemoryMax(512)
SetMTMode(3,0)
ffdshow_source()
SetMTMode(2)
dispWidth = 1920
dispHeight = 1080
mWidth = float(last.width)
mHeight = float(last.height)
ratio = (mWidth/mHeight)
newHeight= round((dispWidth/ratio)/2)*2
newHeight > dispHeight ? Eval("""
newHeight=dispHeight
newWidth=round((newHeight*ratio)/2)*2
""") : Eval("""
newWidth=dispWidth
""")
spline64resize(newWidth,newHeight)
LSFMod(defaults="slow",ss_x=1.0,ss_y=1.0,strength=80)
SetMTMode(1)
GetMTMode(false) > 0 ? distributor() : last

34) For DivX & Other profiles,
SetMemoryMax(512)
SetMTMode(3,0)
ffdshow_source()
SetMTMode(2)
LSFMod(defaults="slow",ss_x=2.0,ss_y=2.0,strength=80)
SetMTMode(1)
GetMTMode(false) > 0 ? distributor() : last

For HD monitor or TV (1280 X 720 / 1366 X 768 resolution)
* The coding "SetMTMode(3,0)"; the "0" mean "auto" for number of processing threads. You can change it to your corresponding number of threads.
32) For FHD profile,
SetMemoryMax(512)
SetMTMode(3,0)
ffdshow_source()
SetMTMode(2)
dispWidth = 1280
dispHeight = 720
mWidth = float(last.width)
mHeight = float(last.height)
ratio = (mWidth/mHeight)
newHeight= round((dispWidth/ratio)/2)*2
newHeight > dispHeight ? Eval("""
newHeight=dispHeight
newWidth=round((newHeight*ratio)/2)*2
""") : Eval("""
newWidth=dispWidth
""")
LSFMod(defaults="slow",ss_x=1.0,ss_y=1.0,strength=40)
spline64resize(newWidth,newHeight)
SetMTMode(1)
GetMTMode(false) > 0 ? distributor() : last

33) For HD profile,
SetMemoryMax(512)
SetMTMode(3,0)
ffdshow_source()
SetMTMode(2)
LSFMod(defaults="slow",ss_x=1.0,ss_y=1.0,strength=80)
SetMTMode(1)
GetMTMode(false) > 0 ? distributor() : last

34) For DivX & Other profiles,
SetMemoryMax(512)
SetMTMode(3,0)
ffdshow_source()
SetMTMode(2)
LSFMod(defaults="slow",ss_x=2.0,ss_y=2.0,strength=80)
SetMTMode(1)
GetMTMode(false) > 0 ? distributor() : last

35) Under "Output", choose EVERY profile and select "YV12" for "Primary output color space". CHECK only "YV12" & "Set interlaced flag in output media type". Select "Auto" for Method & Field order.

36) Click "OK" to save all settings.

xy-VSFilter
1) Press "o", go to "Playback", UNCHECK "Auto-load subtitles".

ReClock
For setting of ReClock, go to http://casualnfunentertainment.blogspot.com/2013/06/better-audio-from-videos-by-using.html

ArcSoft TotalMedia Theatre
Copy "dtsdecoderdll.dll" from the "Codecs" directory in the ArcSoft TotalMedia Theatre installation directory and paste it to the same directory as "LAVAudio.ax" located. For more information on this decoder, go to http://casualnfunentertainment.blogspot.com/2013/06/dts-hd-decoder-for-pc.html

Blu-Ray Playing With MPC-HC
This media player basically support every types of format except for Blu-Ray Menu. When playing Blu-Ray with MPC-HC, you can only choose blindly without naming or scene preview. This is done by right clicking in MPC-HC, then choose "Navigate" > "Jump To" > choose the scene you want.

Verdict
Every types of video format including Blu-Ray and DVD iso except for WMV video are decoded by LAV filter. The decoded video stream will then be sent to madVR (the graphic processing quality is quite nice except for high demand on graphic card resources) to further process. The decoded audio stream will then be sent to ffdshow to decode again because ffdshow seem to have better audio decoding to my ear. Then the audio stream will be sent to ReClock for further upscaling.