Updated 12 December 2023:
At the top, I will just include a quick update on the latest software I am using and their link. Since with the wide availability of affordable Chinese DAC such as Topping, SMSL, Gustard and etc. The audio is being pass-through to the DAC. Therefore, now I am only using MPC-HC + madVR.
1) Media Player Classic Home Cinema https://github.com/clsid2/mpc-hc/releases
With many of the K-Pop and C-Pop MV available on YouTube, now we can just stream the MV from YouTube using MPC-HC with our madVR HQ-PQ (high quality picture quality).
3) Youtube Streamer & Codec :
yt-dlp.exe https://github.com/yt-dlp/yt-dlp/releases
ffmpeg.exe https://www.gyan.dev/ffmpeg/builds/
OLD Section (June 2015):
Media Player Classic, LAV Filters & madVR have some huge chances since my last post
and here is some highlight of the main chances:
i) LAV Filter has been used as Media Player Classic internal filter ( mean that we do not need to download and install LAV as external filter anymore)
ii) LAV Audio able to decode DTS, DTS-HD, TrueHD using libdcadec ( mean that we do not need to use external ArcSoft decoder anymore)
iii) madVR new "NNEDI3" is producing nice picture quality in my opinion ( mean that we do not need to install AviSynth anymore in my opinion)
Software to download:
1) Media Player Classic Home Cinema http://nightly.mpc-hc.org/
2) madVR http://forum.doom9.org/showthread.php?t=146228
3) ffdshow http://sourceforge.net/projects/ffdshow-tryout/files/SVN%20builds%20by%20clsid/generic%20builds/
* UNCHECK everything in ffdshow during installation process except "Audio Decoder"
3) ffdshow http://sourceforge.net/projects/ffdshow-tryout/files/SVN%20builds%20by%20clsid/generic%20builds/
* UNCHECK everything in ffdshow during installation process except "Audio Decoder"


Media Player Classic Home Cinema (MPC-HC)
1) After everything installed, open MPC-HC.
2) Press "o", go to "Playback" > "Output". For "Audio Renderer", choose "ReClock Audio Renderer".
3) For "DirectShow Video", choose "madVR" or choose "Enhanced Video Renderer (custom presenter)" for those having problem with madVR.

4) Then, go to "External Filters", click "Add Filter" and add "ffdshow Audio Decoder".
5) After adding it, make sure to set it to "Prefer".

6) Since, "LAV Filter" is the "Internal Filters" for now, we used the default settings for "Source Filters" and "Transform Filters".
7) Therefore, in order to change "LAV Filter" settings, we need to click the three button available at the bottom.

8) Then, click "Video Decoder".
9) For "Hardware Decoder to use":
Choose "Intel QuickSync" for Intel HD integrated graphicChoose "DXVA2" for ATI Radeon graphic card
Or just leave it at "None"
* Make sure the settings that you choose have an "Available" shown beside it.
** For PC that have i3 processor or better but have lower Graphic Card (normally laptop), choose "None" when you experience lagging in playing HD files.

CHECK "Enable Adaptive HW Deinterlacing" & "High-Quality Processing".

10) Click "Apply" to save all the settings.
madVR
1) Open a video file with MPC-HC.
2) Right click and choose "Filters" > "madVR".

3) Choose "Edit Settings".
1) Open a video file with MPC-HC.
2) Right click and choose "Filters" > "madVR".

3) Choose "Edit Settings".

4) Under "devices", choose the device type. Should be "Digital Monitor/TV" unless you are using CRT.

5) Under "processing" > "deinterlacing", you can either UNCHECK everything.

6) Under "rendering" > "general settings", you can either UNCHECK everything or CHECK "enable automatic fullscreen exclusive mode" that ignored all the interruption from your PC when you are in fullscreen mode or CHECK "enable windowed overlay (Windows 7 and newer)".

8) Then for "trade quality for performance", UNCHECK everything.

9) Now to set the "scaling algorithms" for madVR. First download GPU-Z from http://www.techpowerup.com/downloads/SysInfo/GPU-Z/ and run it.
10) Then test the following settings from top to bottom and see at which setting that your GPU load is not too high (less than 80%):
chroma upscaling image upscaling image downscaling
NNEDI3, AR Jinc, AR Catmull-Rom, AR, LL
Jinc, AR Jinc, AR Catmull-Rom, AR, LL
Bicubic, 75, AR Lanczos, 3 taps, AR Catmull-Rom, AR
Bicubic, 75 Lanczos, 3 taps Catmull-Rom
Bilinear Bilinear Bilinear
*AR = activate anti-ringing filter
*LL = scale in linear light


11) Click "OK" to save all settings.
ffdshow
1) Press "Start" > "All Programs" > "ffdshow" > "Audio decoder configuration".

2) Under "Codecs", choose "all supported" for "Uncompressed".

3) Under "DirectShow control", choose "only one - check all previous filters" for "Multiple ffdshow instances".

4) Under "Profiles/Preset settings" > "Decoder options", CHECK "Enable jitter correction".

5) For "Processing", CHECK everything.

6) Then go to "Mixer", for 2.0 speaker user, just CHECK "Mixer" and select "2/0/0 - stereo" for "Output speaker configuration".

For 2.1 speaker user, CHECK "Mixer" and "LFE" and select "2/0/0 - stereo" for "Output speaker configuration".

7) For "Output", CHECK "16-bit integer", "24-bit integer", "32-bit integer" & "32-bit floating point".

8) Click "OK" to save all settings.
ReClock
1) Open ReClock. At the "Audio settings" tab, UNTICK everything.

2) Go to "Video settings" tab

UNTICK "Use built-in estimator (recommended)" on both side as these settings may chuck up the videos after few seconds of opening.
3) Go to "Advanced settings" tab and UNTICK everything except (B) "Force ReClock to be loaded instead of default renderers (recommended)".
OPTIONAL: TICK (A)"Give high CPU priority to player", this setting will let your player have higher priority over other software and ensure less lagging and chuck up.
4) Click "OK" and ReClock is ready to use. So everytime you open a supported media player such as Media Player Classic, Zoom Player, PowerDVD and etc, a box will pop up and ask whether to load ReClock or not. You can either choose to always load or never load. These setting can be change in (C).
1) Press "Start" > "All Programs" > "ffdshow" > "Audio decoder configuration".

2) Under "Codecs", choose "all supported" for "Uncompressed".

3) Under "DirectShow control", choose "only one - check all previous filters" for "Multiple ffdshow instances".

4) Under "Profiles/Preset settings" > "Decoder options", CHECK "Enable jitter correction".

5) For "Processing", CHECK everything.

6) Then go to "Mixer", for 2.0 speaker user, just CHECK "Mixer" and select "2/0/0 - stereo" for "Output speaker configuration".

For 2.1 speaker user, CHECK "Mixer" and "LFE" and select "2/0/0 - stereo" for "Output speaker configuration".

7) For "Output", CHECK "16-bit integer", "24-bit integer", "32-bit integer" & "32-bit floating point".

8) Click "OK" to save all settings.
ReClock
1) Open ReClock. At the "Audio settings" tab, UNTICK everything.

A) Set PCM to "WASAPI Exclusive".
B) Pre-buffer Duration, leave it as "500".
OPTIONAL: You can test around and see which setting suit your personal taste ranging 25 to 1000.
C) For Format set it to "24 bit int padded to 32" while for Sampling rate, it can be leave as "Same as input (default)" for normal users or UD100.
OPTIONAL: If your DAC is capable of better setting then set Sampling rate to your DAC max setting such as 96kHz, 192kHz or 384kHz.
D) Set Quality to "Best Sinc Interpolation".
2) Go to "Video settings" tab

UNTICK "Use built-in estimator (recommended)" on both side as these settings may chuck up the videos after few seconds of opening.
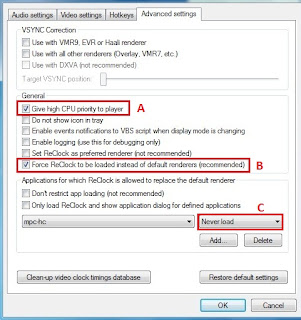
3) Go to "Advanced settings" tab and UNTICK everything except (B) "Force ReClock to be loaded instead of default renderers (recommended)".
OPTIONAL: TICK (A)"Give high CPU priority to player", this setting will let your player have higher priority over other software and ensure less lagging and chuck up.

4) Click "OK" and ReClock is ready to use. So everytime you open a supported media player such as Media Player Classic, Zoom Player, PowerDVD and etc, a box will pop up and ask whether to load ReClock or not. You can either choose to always load or never load. These setting can be change in (C).
Verdict
It's actually quite happy to see new breakthrough and collaboration to further improve PC Media Player quality as nowadays I am using my PC as a media center more and more frequent.
It's actually quite happy to see new breakthrough and collaboration to further improve PC Media Player quality as nowadays I am using my PC as a media center more and more frequent.